The most useful Facebook privacy settings
May 29, 2010
Facebook is arguably the best but most used social networking site on the internet and it always amazes us how free people are with their personal information. However, in recent months Facebook has come under increasing criticism because of the questionable methods it used to expose your data with the changes it made in December 2009.
So it’s important that you review your privacy settings to ensure that only the people you want to view you data can.
Why is this so important?
Well two immediate reasons. Firstly, current and potential employers regularly review Facebook profiles to obtain any information that may affect your job prospects.
But far more importantly, this information is increasingly used by criminal gangs due to the simplicity with which they gain basic valuable information. This is then used to further engineer direct attacks against you to obtain the additional private data.
“But a criminal isn’t going to spend time reading my data?” They don’t. Huge computer nework scrape and analyse this data for them.
Balanced Privacy
The settings we recommend here are designed to help protect you and are purely subjective. It is up to you to determine where you want to draw the line.
Remove yourself from Facebook Search Results
This stops people finding you using the Facebook search. While this will stop long lost friends finding you it also stops general information leakage.
- Click on Account > Privacy settings.

- Click Search.

- Select “Friends Only”

Remove yourself from Public Search Results.
Uncheck this option as it allows public search engines to cache your data. Once they have it you have no control of it.
- Click on Account > Privacy settings.
- Click Search.
- Uncheck “Public Search Results"

Protect your Albums
Most of the time when you upload your photos it’s to share with your friends but, by default, any one can see them.
- Click on Account > Privacy settings.
- Click Personal information and posts

- Click the “Edit Settings” button on “Photo Albums”
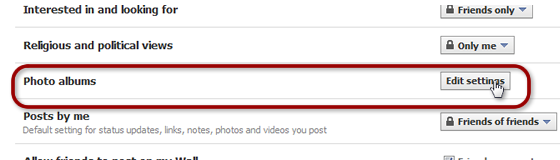
- Change these setting to “Friends only”

Beware of Published Applications
Facebook state in their guide to privacy that they "do not give—and have never given—anyone's data or personally identifiable information to advertisers" [which is not quite true] . But this does not stop third party applications access your data and that of your friends.
- Click on Account > Privacy Settings.
- Click “Applications and websites”
- On “Activity on applications and games dashboards” change this to “Friends Only”
In Addition check you general application settings.
- Click on account > Application settings.
This section requires close attention but ensure that you check out “Granted additional permissions” and “Allowed to post”
Protect your dignity on tagged photos
Many people share their photos on Facebook and sometimes there are situations where you would prefer not to be tagged. If you are tagged in a photo then it’s easy to track you down.
- Click on Account > privacy Settings.
- Click “Friends, tags and connections”
- Change the “Photos and videos of me”, at the very least, to “Friends only”
Remove yourself from Facebook “Instant Personalisation” feature.
This option allows partner website to access your data in order to give you a more personal feel. But this does not stop your friends sharing your data if they do not disable their “Instant Personalisation”. So make sure you block access as outline above in the Beware of Published Applications section.
- Click on Account > Privacy Settings.
- Click “Applications and websites”
- Under the “Instant personalisation pilot programme” click the “Edit Setting” button.
- Uncheck the “Allow select partners…” option at the bottom.
- Confirm the popup that remove this feature.
Remove yourself from adverts
Now whilst this isn’t a Facebook issue, you photo could be used in promotional ads as Cheryl Smith found out.
- Click on Account > Account Settings
- Click the “Facebook Adverts” tab.
- Select "No one " from the "Allow ads…"drop down.
- Click the "Save Changes" button.
Menu
Got a question?